
Halloween Caramel Apples
If you’ve been around for a while you know that J Morgan’s Caramel Block (#9068) has been a customer favorite for years because it makes this classic fall treat so easy. With only a handful of ingredients, these Caramel Apples are guaranteed to be a hit. For a classic treat, coat in heavenly caramel, chopped nuts, and white glaze, but with a few simple variations- you can take this treat from sweet to spooky!
Spooky Variations
- Add 2-3 drops of black, purple or green food coloring to the melted caramel.
- Use Dawn White Flat Icing (#1910) to decorate with spider webs, as mummies, or as skeletons.
- Roll in halloween sprinkles.
- Once the caramel is set, coat with melted white chocolate for ghost apples.
- Chop up candy corns for a festive treat.
A few words of wisdom when it comes to perfecting caramel apples:
- Don’t Refrigerate: Many people recommend refrigerating your apples. I’ve had the best results keeping them at room temperature. If your apples are cold before you dip them in caramel, when the caramel warms up, it tends to get condensation on it. See “Wet = Mess†below. When the apple condenses under the caramel, it will liquefy and slip off your apple. I also don’t refrigerate after dipping in caramel.
- Wax = Mess: Usually, most apples purchased in the store are coated with a waxy film to prevent spoilage. This film often prevents the caramel from sticking to the surface of the apple. Dipping each apple into boiling water for about 10 seconds will remove this film. Dry thoroughly and allow to cool to room temperature.
- Wet = Mess: It’s important that the apples are washed and then thoroughly dried prior to plunging them into the hot caramel. Any trace of moisture on the apples will cause the caramel to slip and slide right off.
- Tiny Toppings: The smaller, more finely chopped your toppings, the better shot you have at them staying in place as the caramel cools.
- Cool Avoids a Pool: … of caramel, that is! If you’re opting for a second layer of deliciousness in the form of melted chocolate, alway ys allow the first layer of caramel to cool completely before plunging your apple into a warm bath of chocolate.
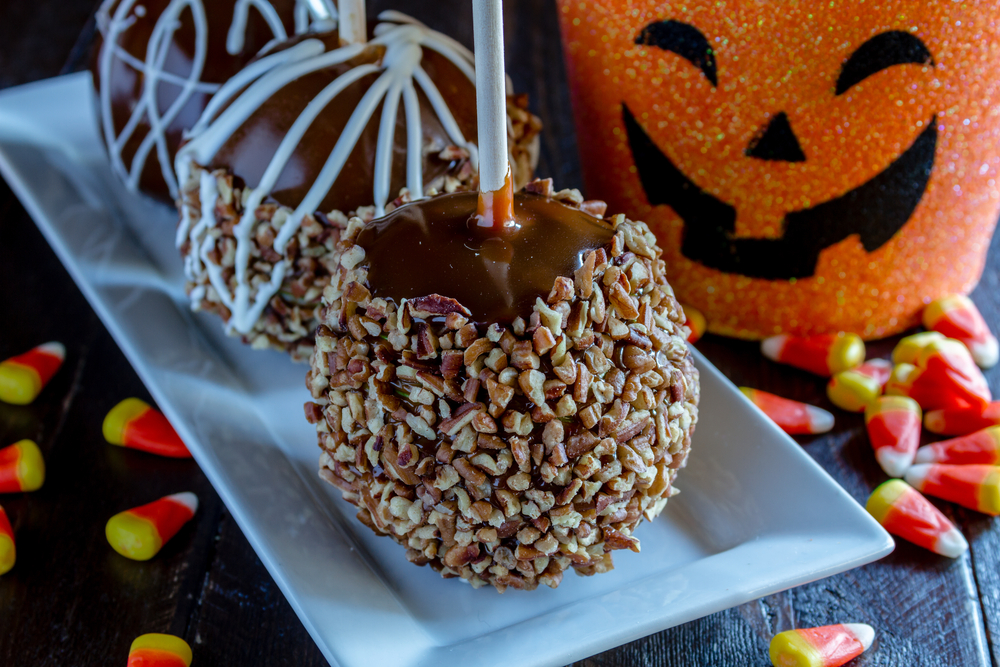
With only a handful of ingredients, these Caramel Apples are guaranteed to be a hit. For a classic treat, coat in heavenly caramel, chopped nuts, and white glaze, but with a few simple variations- you can take this treat from sweet to spooky!
Halloween Caramel Apples
Ingredients:
- 1/2 brick of J Morgan Heavenly Caramels Caramel Block (#9068)
- Norpro Wooden Treat Sticks (#2836)
- Optional toppings: Diamond Fancy Medium Pecans Pieces (#2812), Dawn White Flat Icing (#1910), toffee bits, M&M’s, sprinkles, etc.
Instructions:
- Line a Crestware Baking Sheet (#5957) with parchment paper (#1153).
- Press a stick into each apple.*
- Bring a medium pot of water to a boil. Dip each apple and allow to cool to room temperature. This process will ensure that the caramel properly adheres to the apple.
- Melt the caramel in a large microwave-safe bowl. (Glass is best.) Melt for 2 minutes, then stir. Melt for another 2 minutes, then stir again. Now, melt for 30 seconds at a time until the caramel reaches a temperature between 180 and 185F**.
- Dip each apple into the caramel, slowly spinning the apple to evenly coat it. Dip all the way to the stick to completely seals the apple***.
- Remove the apple from the caramel to allow it to drip for a bit. Scrape the excess caramel off the bottom. As long as the caramel is warm enough, it will continue to fall down the sides of the apple, so don’t be afraid to scrape off a lot. This will keep the “foot†of caramel at the bottom of the apple to a minimum.
- If you want to add toppings to your apple, this is the time. If you wait too long to add toppings, the caramel will be too cool to allow the toppings to stick well. So, work quickly. (Now is not the time to add chocolate).
- Place each apple onto your parchment lined baking sheet and allow to completely set. Depending on the temperature of your room, the caramel should be completely set and cool within 30-60 minutes.
- If you want, you may now dip your caramel apple in chocolate or drizzle chocolate over the top. Place the apples back on the parchment paper and allow to set again.
- Enjoy!
Recipe notes:
*Be sure that the stick does not come out the bottom. If it does, juice will escape from the apple and the caramel will liquefy on the bottom.
**The temperature is very important. If it’s too hot, it will firm up too hard. If it’s too cool, it will be difficult to
evenly coat the apple.
***This prevents possible pokes to the apple, which would leak juice and liquefy the caramel. But you can dip your apples as far up as you like. If you want a little apple showing through the top, go for it!
Looking for more caramel apple treats?
Comments
- Halloween Cupcake Ideas - Alisons Pantry Delicious Living Blog - […] Halloween Caramel Apples Halloween Candy Caramel Corn Chocolate Dirt Pudding SharePinTweet0 Shares 0Shares Share on Facebook Share on Twitter…